Sourdough English Muffins

Sourdough English Muffins are a delicious use for sourdough starter discard removed when feeding and easy enough for novice bread makers. You can even turn the dough into an incredibly tasty breakfast bread instead of individual muffins!
Note: This recipe received a major update in 2020 with lots of new tips and tricks, a variation for a bread loaf, and more.
There are few things I enjoy more than some toasted sourdough with butter. The sourdough english muffins give me an excuse to enjoy that all year round!

With no need to heat up the oven these have become a weekly staple in our home. It is an easy recipe to use sourdough discard!
You can also use sourdough discard in Sourdough Pancakes, Sourdough Naan, or even Sourdough Banana Bread!
Table of contents
Ingredients you need:
- Unfed sourdough starter
- Milk
- All purpose flour
- Sugar
- Salt
- Baking soda
- Cornmeal
You can make your own sourdough starter, get starter from a friend, or you can buy dehydrated starter.

How to make sourdough English muffins
- Combine starter, 2 cups flour and milk in a large bowl. Stir to combine, cover with plastic wrap, and leave out for at least 8 hours, or overnight.
- After the overnight rest, add the remaining flour, sugar, salt, and baking soda and mix well.
- Turn onto a lightly floured board and knead 4-5 minutes until dough is smooth and elastic.
- Roll out dough to 1/2″ and cut into rounds using a 3″ cookie or biscuit cutter. You can re-roll the scraps but you need to let the dough rest at least 10 minutes before cutting more muffins from them. (see tips from the readers below for ways to reduce re-rolls)
- Place muffins on a piece of parchment or cookie sheet dusted with cornmeal. Let rest for at least 45 minutes (for more nooks and crannies see tips below).
- Spray griddle or skillet lightly with oil. Heat to medium and cook muffins for about 6-8 minutes on each side or until browned on top and bottom and cooked through (internal temperature should be 195°F).

Tips for cooking the English muffins:
- I find they cook up best on a cast iron skillet versus a traditional skillet.
- English muffins should not be thicker than 1/2″ or they will be too thick and won’t cook.
- If the heat is too high, the outside will cook before the center is cooked. If you find the center is still doughy, lower the heat.
- If the center is still slightly underdone you can always stick them in the oven at 350°F for about 5-10 minutes until they are done.
- Use a digital kitchen thermometer to make sure the muffins have cooked through. They should be between 195° and 200°F

Can you use the dough to make this as a loaf?
I have gotten a lot of love on my Sourdough English muffin recipe about how wonderful they are but I’ve also gotten a lot of complaints about how long it takes to cut them out and leave them to rest, etc.
Well, I now can tell you that you can make excellent bread with the same dough and that it is far less effort to make! The sliced bread would also work for our favorite lunchtime staple- Simple Sourdough Pizzas.

How to make this as a bread loaf:
*Follow the first two steps of the recipe to make the overnight sponge and then the dough.*
- Turn the dough onto a lightly floured board and knead 4-5 minutes until dough is smooth and elastic. Roll the dough into a log shape about 9″ long.
- Grease a loaf tin with cooking spray and lightly dust with cornmeal. Place your bread loaf into the pan. Sprinkle a little more cornmeal over the top of the loaf. Cover with plastic wrap and keep in a warm place until the loaf has risen to the top of the pan, about 2-3 hours.
- Bake in a 350 degree F oven for 30-35 minutes or until bread is a light golden brown on the outside and reaches an internal temperature of 195 degrees F.
- Carefully remove bread from the loaf tin and allow to cool completely on a cooling rack before slicing.
Tips for making this as a bread instead of muffins
The amount of time it will take for the bread to rise will depend a lot on the warmth of where it is rising. A long slow rise will give you a better sourdough flavor so don’t necessarily be in a hurry to speed along the proving process.
I did store my bread pan covered in the fridge overnight before cooking so if you want an even stronger sourdough flavor you can do that.
The bread does not have lots of nooks and crannies and a big part of that is having to slice the bread. But the bread tastes fantastic so I haven’t minded the lack of little pockets for the butter to pool.

How can I get more nooks and crannies?
The number one question I get is on how to get more nooks and crannies. I have my suspicions that commercial English muffins have yeast added to give them more rise and therefore more nooks and crannies.
But don’t fear! There are ways to help encourage more little cavities to pool with butter.
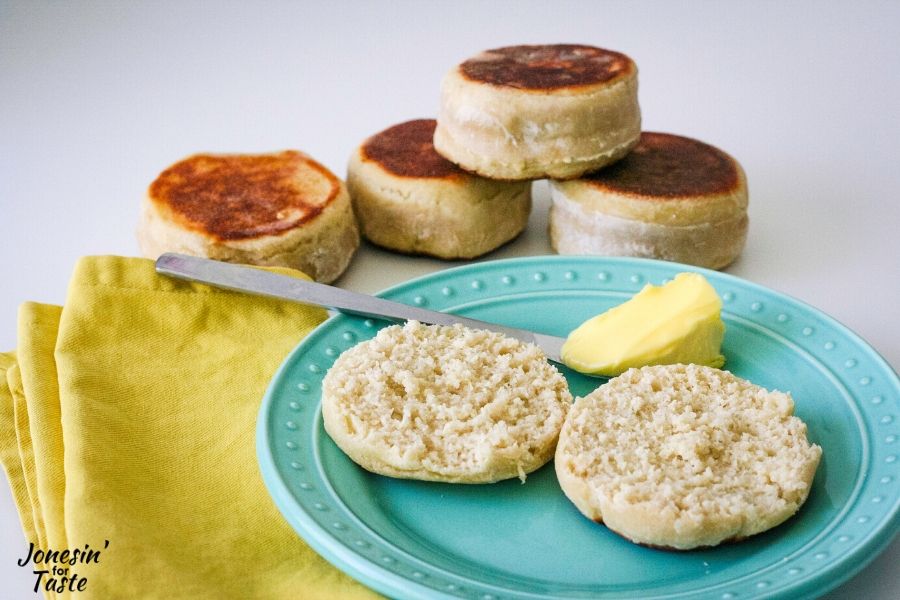
For more nooks and crannies, the best way is to allow the English muffins to rest for longer after cutting them out. I’ve let them rest for over an hour and a half which gave me the results in the picture above.
Also, always make sure you use a fork to stab all the way around the muffins to separate the halves instead of using a knife.
Tips from YOU!
- One reader subbed sour cream for 3/4 of the milk which she said resulted in a wonderfully soft muffins which stayed that way for days. A great tip if you find you are running low on milk.
- Multiple readers offered tips for making these in the oven. Use a baking steel or baking stone in the oven at 275 degrees F baking for 7-8 minutes per side.
- Some suggestions for reducing the number of times needed to roll out the muffins were to cut square muffins or to roll the dough in a log and cut out slices.
Other easy bread recipes to try:
- Bread Machine Oatmeal Breakfast Bread
- Bread Machine Coconut Bread
- 90 Minute Whole Wheat Parmesan Rosemary Rolls

Frequently Asked Questions
- Can you leave the dough out overnight on its initial rest even with the milk in it?
- YES! It’s totally fine.
- Do I have to feed my sourdough starter before I use it?
- NO, you do not need to feed the starter before making the english muffins. This is a great use for the starter you remove when feeding.
- Can you freeze the cooked english muffins?
- YES! I always make a double (or triple) batch and freeze them in a ziploc bag. They will keep for about 3 months in the freezer.
- To reheat, microwave 45 seconds to 1 minute. Split and toast as usual.
- YES! I always make a double (or triple) batch and freeze them in a ziploc bag. They will keep for about 3 months in the freezer.
Do you follow Jonesin’ For Taste on Facebook? Stop by, say hi, and let me know what kinds of recipes you want to see!
Sourdough English Muffins
Equipment
- 3" cookie cutter
Ingredients
- 1/2 cup sourdough starter
- 1 cup milk
- 2 3/4 cup all-purpose flour
- 1 Tablespoon sugar
- 3/4 teaspoon salt
- 1 teaspoon baking soda
- cornmeal for dusting
Instructions
- Combine starter, 2 cups flour and milk in a large bowl. Stir to combine, cover with plastic wrap, and leave out for at least 8 hours, or overnight.
- After the overnight rest, add the remaining flour, sugar, salt, and baking soda and mix well.
- Turn onto a lightly floured board and knead 4-5 minutes until dough is smooth and elastic.
- Roll out to 1/2" and cut into rounds using a 3" cookie or biscuit cutter. You can re-roll the scraps but you need to let the dough rest at least 10 minutes before cutting more muffins from them.
- Place muffins on a piece of parchment or cookie sheet dusted with cornmeal. Let rest for at least 60 minutes (longer is better).
- Spray griddle or skillet lightly with oil. Heat to medium-low and cook muffins for about 6-8 minutes on each side or until browned on top and bottom and cooked through.


Do you know if the recipe can be made and baked instead of finishing on a griddle? If so, will you send me the instructions. I like baked English muffins. Thanks.
I made this as a loaf and it was really tasty, but texture was a little off. I’m wondering if it was due to the amount of flour I added – is there a way to post measurements in weight so I can ensure proper amounts?
The next time I make this I will try and remember to do weights. I have found though that it really is so dependent on how wet your starter is among other variations in environment. You are aiming for a soft dough but one that can still hold it’s shape in a ball. Hope that helps in the meantime.
I made a substitution with using half and half instead of milk and baked in a loaf…it is DIVINE!
Wonderful! My first batch was the little rise lump kind in the cast iron pan but this does not compare to yours!
You need to be patient. Your patience will be rewarded! Thank you! New to the sourdough journey! Linda
You would think I won the lottery! I was so excited with the way these came out! So easy, so delicious. The dough is so lovely and easy to work with. I will be making over and over again!! Thanks so much for this incredible recipe!
I love this recipe. They taste absolutely fabulous. However, a couple of things…first of all, 3″ muffins aren’t big enough for my farm fresh eggs, and secondly, yours (in the picture above) look like they’ve actually risen, but I’ve made a few batches and not having the same success. Any help is greatly appreciated.
If you need bigger muffins you can cut them with a larger cutter, 3″ is just the standard size you get from the grocery store. You will need to adjust the cooking time and temperature so that the center cooks through, if you have trouble you can try baking them to finish them off. In regards to the not rising, it could be several things. You’re baking soda could be old so it isn’t activating as much. Try using baking soda from a new container. You could also try using buttermilk instead of milk to see if you can get an additional rise from that. The other trouble could be that your sourdough starter is not active enough especially if it has been sitting dormant for a while. Go through a round of feedings to see if you can get it active again. Hope that helps!
Greetings from the UK! We adore these. Used lactose free milk so my brother can have them. So good toasted with lashings of butter and jam. (They freeze really well) As you say, resting is the secret – I leave covered with a tea towel for at least 4 hours. Although doing that I get kitten paw marks on them sometimes!
In fact, if l was told I could only ever make one sourdough product going forward, we’d choose these. Closely followed by crackers and then bread.
Absolutely perfect! Thanks so much.
Easy to follow recipe, too.
Made these for the first time and love them. I used a 3” round cutter and they were a little small, will use the next size when I do them again, and I will be making them regularly. One issue I had – the didn’t stay a consistent size, some shrink up At least an inch. Any idea what I did wrong?
The shrinking occurs when you reroll the dough. Let it rest for longer in between rolls which should help. Or you could try making square muffins so you don’t have to reroll which is what some other readers have suggested.
Hi there, this recipe is very good and I have a question for anyone who knows the answer. I leave out the sugar and use buttermilk if I have it.
The English Muffins come out beautifully, however, after a few days the side turn quit gray. It doesn’t seem to affect the taste, but it’s not that appetizing. Any suggestions as to why this is happening.
Thank you
From the research I have done it seems to be the reaction of the sourdough with the baking soda and I haven’t found a way to prevent that from happening. If you put them in the freezer right away it seems to stop that from happening.
Ibmessed up and put all ingredients in mixer at once imcluding the bKing soda….will this be a fail?
I don’t think so, it just most likely won’t be as sour. I would not let it sit out overnight though but let it rise until the dough doubles in size and then shape the muffins from there.
This recipe turned out great the first time. I made mine with GF brown rice starter and GF up for cup flour. I did maybe 1/4 less flour than the recipe calls for. My sister has celiac and she loves these, closest thing to the sourdough Thomas English muffins we used to buy! No store bought English muffins needed now!
Thank you so much for sharing what worked for you to make this gluten free! GF baking is always tricky and I know your tips will help others.